Samples are an incredible tool at all levels of music production, opening up all kinds of new creative horizons. However, they can be confusing and difficult to implement effectively. Here we explore how to use samples the proper way.
_______________________
Guest post by J’vlyn d’Ark of Soundfly’s Flypaper
Samples are good for everything. They’re one of the most flexible and useful tools for any stage of music production. But mixing with samples is confusing…
How do you get them out of the pack, and into your track without wrecking everything?
Samples come in many shapes and sizes, but they’re rarely ready to drag and drop into your tracks without a bit of work to make them fit. After all, most samples have already been mixed and mastered on their own.
In this guide to mixing with samples, I’ll walk you through the 6 steps for getting your samples cleaned, mixed, and ready for your tracks.
1. Clean it up
Samples usually have lots of unnecessary noise. If you’re hearing some unwanted hiss or fuzz in your sample, start by using a noise gate.
Noise gating will help you get rid of noise and give you a cleaner sample before you even start mixing.
Noise gating will help you get rid of noise and give you a cleaner sample before you even start mixing.
Here’s the sample before gating:
There’s a lot of unwanted fuzz in the original. So it’s time to gate it out.
Here’s the same sample after using a noise gate:
A lot of the noise has been tamed and attenuated for a cleaner sound.
To finish it off, use some multi-band expansion or compression to target specific frequency ranges. This will reduce unwanted noise, hiss, hums, or transients.
Here’s the same sample after experimenting with some multi-band expansion:
Finally, go ahead and cut out any silence. Unless it fits your track, there’s no reason to keep parts where nothing is playing, remove that section entirely. Even if you don’t hear any noise, there’s probably some in there and you simply don’t need it.
Voilà! These simple tricks will pay off big later on. A clean sample now will make mixing later a lot easier later because you won’t be fighting all that noise.
A clean sample now will make mixing later a lot easier later because you won’t be fighting all that noise.
If you wanna get even more specific with your clean-up, waveform editing softwares like Audacity are fantastic tools for making precision edits to your sample’s waveform.
Use them to do surgical work on your sample and remove pops or clicks you don’t want in your final track.

2. Slice and Loop
So, you’ve found and cleaned your sample, what next? If your sample matches your track’s tempo and key, and you want to use the entire sample: fantastic! That was easy, time to move on to the next step.
But not all samples are ready to go right away… Most of the time you’ll have to make some changes to your audio in order to get it ready.
Not all samples are ready to go right away… Most of the time you’ll have to make some changes to your audio in order to get it ready.
Beat Slicing
Beat slicing allows you to slice up a sample into its individual beats, or hits, allowing you to work with each hit individually. If you’ve ever chopped a break to create a drum rack then you’ll already be familiar.
But chopping isn’t just for drums… All samples benefit from some creative chopping. Many DAWs are able to chop automatically with fairly reliable results. In this example, I’m going to look more closely at Ableton’s Simpler and show you what it can do, but the same concepts apply no matter what DAW you use.
Start by dragging a sample of a loop onto a MIDI track’s Device View (the grey area at the bottom) in Ableton—this will automatically load it up into Simpler.
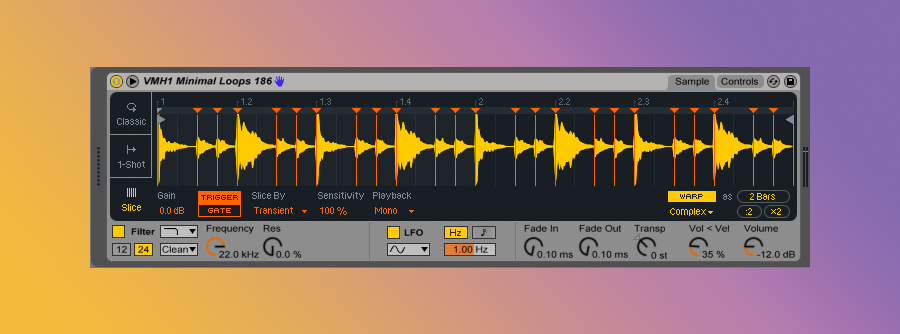
Next, select ‘Slice’ from the lower left-hand side of Simpler. It should look something like this:

Ableton automatically searches for the transients in this sample and sliced the loop into individual drum hits. Ableton also automatically assigned each of those hits to a midi note, which can now be triggered by programming notes in your DAW or with your MIDI controller.
You can also experiment with chopping manually for some extra control.
With everything chopped you can now rearrange and play with the the drum hits to suit whatever groove you want. So easy! Good mixing starts with clean samples and a good arrangement. Slicing your samples will give you everything you need to find the right arrangement for your track.
But wait, there’s more: now that the individual hits are separated, you can also mix, arrange, and affect them individually. This gives you far greater control over your sample, allowing you to tailor it to your mix’s needs.
Looping
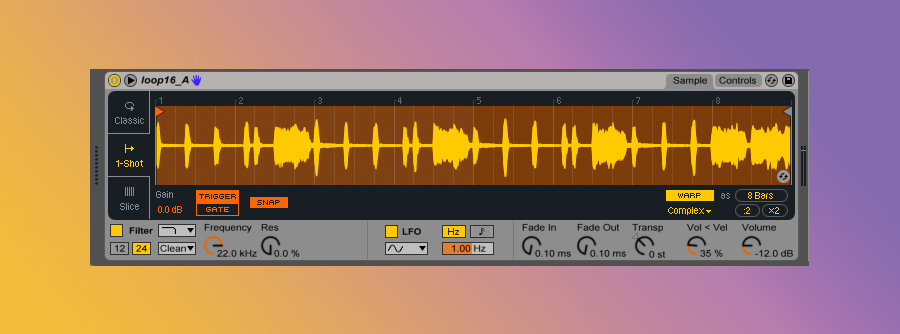
Another great use is dropping a loop (let’s do a vocal this time) and selecting ‘1-Shot’ from the left-hand side of the Simpler. It should look like this:

Simpler will re-pitch my sample without shifting the tempo. Move the in/out markers of the loop to select which part of the vocal to use. This gives you the power to trigger any part of the sample in any key you want!
3. EQ your samples to fit
Now that you’ve got your samples cleaned, sliced and ready to use, it’s time to start fitting them into your mix. Like most parts of the mixing workflow, everything starts with some smart EQing.
Generally, the rules for EQing samples are the same as any other sound. However, samples often contain a wider range of frequencies. Especially samples of another song, or a sample of someone speaking. Too much of any frequency range can muddy your track, which is why EQing is always so important and necessary for your samples.
What EQ fits
Here are some helpful examples for EQing certain samples:
- Boost around 100Hz to add warmth to piano and horns
- Cut around 400Hz to reduce “boxiness” in snares and kicks
- Boost around 1.5KHz to add “pluck” sound to a bass
- Cut everything below 3KHz in a vocal in order to have it “float” above other instruments
- Boost around 7KHz to add attack to percussion instruments

4. Doubling up
Doubling, which is when two instruments play an identical melody, is a great technique for fattening or adjusting a sample. By figuring out the notes in a sample’s melody, you can program a synth or other MIDI instrument to double the sample and add something that’s missing.
For example, bass samples will get extra deep when doubled by another bass synth.
Here’s a bass sample before pairing it’s notes with another bass:
And after doubling the same notes with a nice fat synth bass:
This technique is commonly used for digital synths as well, which analog enthusiastics often feel are missing some fatness.
Doubling will give you maximum flexibility in your mixing process. Rather than only affecting the sample itself, you can now add similar or different EQs and FX to the doubling instrument as well.
By carefully selecting how to double (or triple!) a sample, you can broadly transform or surgically tailor it to your mixing needs.
5. Watching the Stereo Image
Another problem samples can create is mismatched stereo images. Many samples are from tracks that have already been mixed and mastered so they’ll have a very specific stereo image.
When the size of your sample’s stereo image doesn’t match your track, the sample will not blend in well—or worse, make your track sound thin and small.
When the size of your sample’s stereo image doesn’t match your track, the sample will not blend in well—or worse, make your track sound thin and small.
To compensate for samples that already have a fairly wide image, you need to widen your track’s stereo image, since wider sound is always better sound.
I’ve already discussed stereo widening in another article, so head over there if you need to boost your image a bit.
If your sample is still sounding too wide and upfront in the mix, try converting it to mono and see how it sounds. Ableton’s Utility effect has a mono preset built in that works great for mono conversion.
If that doesn’t solve your problem, or worse your sample collapses when switched to mono, try returning to the previous step 4 and doubling it up.

6. Getting Creative
Once you’ve dealt with the details of preparing your sample for the mix, take some time to experiment with it.
Resampling is the process of making edits or adding effects to a sample and then re-recording it as a new sample (hence the name resampling). It’s a common technique that provides endless inspiration and possibilities for your tracks.
Resampling produces really cool effects and can bring out bits of your sample you never knew were there!
Once you’ve made a new recorded version of your sample, throw it back into your sampler and do anything you want with it. Try repeating this process several times and see where it takes you.
Perhaps you’ll transform your sample into something even better. Resampling produces really cool effects and can bring out bits of your sample you never knew were there!
Try these resampling techniques to get started:
- Pitch shifting effects to create surreal vibes
- Reversing the sample
- Radically slowing down or speeding up the sample
- Adding favorite FX such as phasing, flanging, echoes, delays, resonance, or filtering
Here’s a sample from the Wavy.audio #maelstrom pack:
And here it is after some re-pitching and slowing down resampling techniques:
Of course this is just one of many ways to resample. There’s no wrong way to do it. Let your imagination run wild!
Put Your Samples to Work
Tailoring a sample to your needs is rarely easy, but the possibilities are endless.
With these techniques under your belt, you’re fully equipped to harness the creative potential of sampling without ruining your mixes. Just remember that the mix itself is #1, so use your samples to support the bigger picture—they work for you, not the other way around!
Happy Sampling!
J’vlyn is a DJ, audio engineer, and A/V artist, with a passion for empowering queer and feminist narratives through audio/visual experiences.